概要
最近遇到一个需求,golang应用部署在远程机器,远程机器在内网,部署之后不方便再次登录此远程机器去升级。
因此,需要golang应用自动检查是否需要升级,如果需要升级,则下载二进制后自升级。
自升级库
golang自升级的库有好几个,比较之后决定采用: https://github.com/jpillora/overseer
此库不是最全面的,但是实现原理和提供的接口比较简单,代码量也不大,便于定制。
overseer 库简介
overseer 将升级的程序启动在主协程上,真正完成功能的部分作为 Program(这个可以当做实际程序的 main 函数)运行。
其中最重要的2个部分是 **Config **和 Fetcher。
Config
overseer 通过 Config 结构提供了一些参数来控制自更新。
// Config defines overseer's run-time configuration
type Config struct {
	//Required will prevent overseer from fallback to running
	//running the program in the main process on failure.
	Required bool
	//Program's main function
	Program func(state State)
	//Program's zero-downtime socket listening address (set this or Addresses)
	Address string
	//Program's zero-downtime socket listening addresses (set this or Address)
	Addresses []string
	//RestartSignal will manually trigger a graceful restart. Defaults to SIGUSR2.
	RestartSignal os.Signal
	//TerminateTimeout controls how long overseer should
	//wait for the program to terminate itself. After this
	//timeout, overseer will issue a SIGKILL.
	TerminateTimeout time.Duration
	//MinFetchInterval defines the smallest duration between Fetch()s.
	//This helps to prevent unwieldy fetch.Interfaces from hogging
	//too many resources. Defaults to 1 second.
	MinFetchInterval time.Duration
	//PreUpgrade runs after a binary has been retrieved, user defined checks
	//can be run here and returning an error will cancel the upgrade.
	PreUpgrade func(tempBinaryPath string) error
	//Debug enables all [overseer] logs.
	Debug bool
	//NoWarn disables warning [overseer] logs.
	NoWarn bool
	//NoRestart disables all restarts, this option essentially converts
	//the RestartSignal into a "ShutdownSignal".
	NoRestart bool
	//NoRestartAfterFetch disables automatic restarts after each upgrade.
	//Though manual restarts using the RestartSignal can still be performed.
	NoRestartAfterFetch bool
	//Fetcher will be used to fetch binaries.
	Fetcher fetcher.Interface
}
一般用不到这么多参数,核心的是:
- Program
- Fetcher
常用有:
- Address
- Addresses
- MinFetchInterval
- PreUpgrade
Fetcher
除了 Config,overseer 中另一个重要的接口就是 Fetcher。
Fetcher 接口定义了程序如何初始化和更新
package fetcher

import "io"

// Interface defines the required fetcher functions
type Interface interface {
	//Init should perform validation on fields. For
	//example, ensure the appropriate URLs or keys
	//are defined or ensure there is connectivity
	//to the appropriate web service.
	Init() error
	//Fetch should check if there is an updated
	//binary to fetch, and then stream it back the
	//form of an io.Reader. If io.Reader is nil,
	//then it is assumed there are no updates. Fetch
	//will be run repeatedly and forever. It is up the
	//implementation to throttle the fetch frequency.
	Fetch() (io.Reader, error)
}
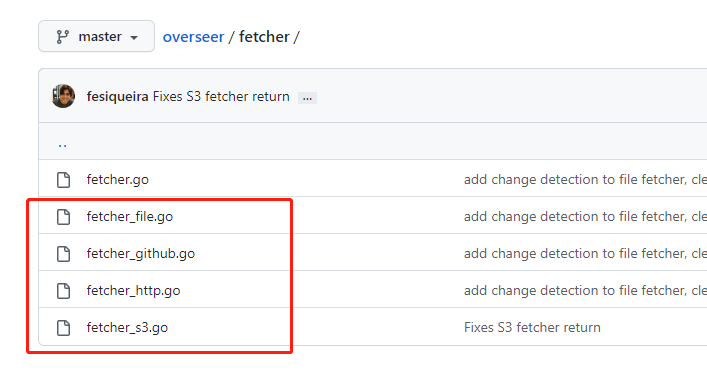
overseer 只带了几个实现好了的 Fetcher,可以满足大部分需求,也可以自己继承 Fetcher 接口实现自己的 Fetcher。

简单的自升级示例
演示自动升级,我们需要编译2个版本的程序。
示例如下:
package main

import (
	"fmt"
	"time"

	"github.com/jpillora/overseer"
	"github.com/jpillora/overseer/fetcher"
)

const version = "v0.1"

// 控制自升级
func main() {
	overseer.Run(overseer.Config{
		Program:          actualMain,
		TerminateTimeout: 10 * time.Second,
		Fetcher: &fetcher.HTTP{
			URL:      "http://localhost:9000/selfupgrade",
			Interval: 1 * time.Second,
		},
		PreUpgrade: preUpgrade,
	})
	// mainWithSelfUpdate()
}

// 升级前的动作,参数是下载的程序的临时位置,如果返回 error,则不升级
func preUpgrade(tempBinaryPath string) error {
	fmt.Printf("download binary path: %s\n", tempBinaryPath)
	return nil
}

// 这里一般写是实际的业务,此示例是不断打印 version
func actualMain(state overseer.State) {
	for {
		fmt.Printf("%s: current version: %s\n", time.Now().Format("2006-01-02 15:04:05"), version)
		time.Sleep(3 * time.Second)
	}
}
上面的程序编译后启动。
$ go build -o selfupgrade

$ ./selfupgrade
2022-05-21 00:46:52: current version: v0.1
2022-05-21 00:46:55: current version: v0.1
2022-05-21 00:46:58: current version: v0.1
2022-05-21 00:47:01: current version: v0.1
2022-05-21 00:47:04: current version: v0.1
启动之后开始不断的打印版本号(间隔3秒)。不要停止此程序。
然后我们修改 version,并且将 actualMain 中的间隔修改为5秒。
const version = "v0.2"  // v0.1 => v0.2

// 。。。 省略。。。

// 这里一般写是实际的业务,此示例是不断打印 version
func actualMain(state overseer.State) {
	for {
		fmt.Printf("%s: current version: %s\n", time.Now().Format("2006-01-02 15:04:05"), version)
		time.Sleep(5 * time.Second)
	}
}
修改之后,再编译一个版本到 ~/tmp 目录(如果不存在提前创建)。
然后启动一个文件服务,我用python自带的方法启动了一个服务,服务端口对应代码中的升级URL("http://localhost:9000/selfupgrade")
$ go build -o ~/tmp/selfupgrade
$ cd ~/tmp
$ python -m http.server 9000
过一会儿之后,就能看到之前启动程序已经更新。
更新之后版本号变成 v0.2,时间间隔变成了5秒
2022-05-21 01:27:22: current version: v0.1
2022-05-21 01:27:25: current version: v0.1
download binary path: /tmp/overseer-5c0865554eb0f83a
2022-05-21 01:27:28: current version: v0.1
2022-05-21 01:27:31: current version: v0.1
2022-05-21 01:27:34: current version: v0.1
2022-05-21 01:27:37: current version: v0.1
2022-05-21 01:27:37: current version: v0.2
2022-05-21 01:27:42: current version: v0.2
2022-05-21 01:27:47: current version: v0.2
Web服务自升级示例
web服务与之类似,比如:
func actualMainServer(state overseer.State) {
	http.Handle("/", http.HandlerFunc(func(w http.ResponseWriter, r *http.Request) {
		fmt.Fprintf(w, "%s: current version: %s\n", time.Now().Format("2006-01-02 15:04:05"), version)
	}))
	http.ListenAndServe(":8000", nil)
}
将上面函数替换 overseer.Config 的Program即可。
通过观察进程的变化,可以看出升级之后就是将子进程重启,主进程没变。
升级前:
$ ps -ef | ag self
wangyub+    8058    4443  1 09:58 pts/12   00:00:00 ./selfupgrade
wangyub+    8067    8058  0 09:58 pts/12   00:00:00 ./selfupgrade
wangyub+    8130    3548  0 09:59 pts/11   00:00:00 ag self
升级后:
$ ps -ef | ag self
wangyub+    8058    4443  0 09:58 pts/12   00:00:00 ./selfupgrade
wangyub+    8196    8058  0 09:59 pts/12   00:00:00 ./selfupgrade
wangyub+    8266    3548  0 09:59 pts/11   00:00:00 ag self
上面的写法,会导致端口的服务中断一会儿,如果要保持端口持续畅通,可以用官方示例中的写法。
overseer.Run(overseer.Config{
		// 。。。省略。。。
		Address:          ":8000",  // 服务的端口
	})
实际的server中使用 state 中的 Listener。
func actualMainServer(state overseer.State) {
	http.Handle("/", http.HandlerFunc(func(w http.ResponseWriter, r *http.Request) {
		fmt.Fprintf(w, "%s: current version: %s\n", time.Now().Format("2006-01-02 15:04:05"), version)
	}))
	http.Serve(state.Listener, nil)  // 这里使用 state 中的 Listener,也就是 Config中的 Address
}
总结
总的来说,overseer 满足了自升级的各种需求。
但是自带的Fetcher功能比较简单,比如HTTP的Fetcher,升级的过程可能只有一个URL还不够,还有更加复杂的版本检查和比较。
实际场景下可能需要定制一个适合自己应用的Fetcher。
文章评论